Friday, April 30, 2010

Ruffled hat Tutorial


I was recently asked for a Tutorial on the ruffled hat I made here. I tried to write on the photo as I went, but I don't like how that came out. So I will write under the picture instead. The white hat was made with a white men's t-shirt, which gives you a lot more stretch then the tank I chose for this pink one.


I traced an old hat and added a little to each side and height because it was for 0-6 months. I folded that pattern in half

Grab an old t-shirt


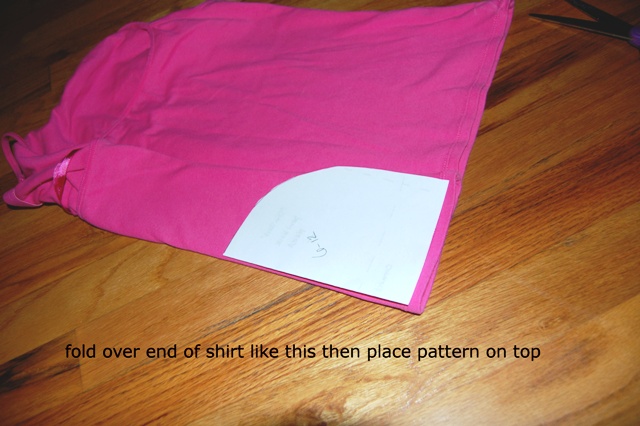
make sure all ends are even, fold the t-shirt over and place pattern piece on top, on fold. If you do it this way both piece will be cut out at the same time


after you cut out this is what you have


cut 1.5 in strips out of the rest of the shirt


All the strips cut


Sew down middle of each strip

Find the bobbin thread and Pull, scrunching fabric to get the ruffles


Starting at bottom use zig zag stitch, slightly stretch the hat part as you sew, so you don't loose the stretch in the hat


All ruffles sewn to hat pieces


Lay right sides together and sew using zig zag stitch, slightly stretching again

Trim around seam


Turn right side out.
All done!


Another top


Last week I made another top. This time using a pattern McCall's 6078. I really liked it in the book. Over all I like way it came out. I am a big fan of a different back that's why I chose this one. I still like the top but I am having a problem with it staying on my shoulders. I think I will have to use double sided tape to hold it in place. I don't think it helps that I am not even 5ft. So the back doesn't sit as low as I would like and it is pretty long. So I am going to try it with a belt and if I don't like it that way I will shorten it.


After coming across Piccoli Pisellie today I found out what I did wrong. She has also made this top. but with different fabric, which is where I think I went wrong. I don't think it helps that I am not even 5ft. So the back doesn't sit as low as I would like and it is pretty long. So I am going to try it with a belt and if I don't like it that way I will shorten it.

car cozy


My son has 2 of these play mats:


a big train table:
(don't mind the mess it's the play room)

but he was choosing to play with this:
(growth chart that I never hung up)


I think he like this because he could take it with him. So after searching the internet I found a car cozy that I like and thought he might like as well. Over a fiskarscraft I found one I liked best. I changed a few things up, but not much. I put a fire house and our house instead of the pond and construction site. I didn't have a shoe lace so I used a pony holder. I also only used 2 fabrics. I used Velcro instead of tie's. I have plans to add long ribbon with Velcro on the ends to close it.

I knew this was my task last night after the kids went to bed, so before he went to bed I told him I had a surprise for him. His response was "what are you making me". I love that he expects things to be made and not always bought and knows that I make them for him. So first thing this morning he was asking for his surprise. "I love it mommy".


It was a big hit!! Both kids loved it

I didn't add the buttons and pony holder until the morning. So the first couple photos don't have them on, but this last one does.

Sunday, April 25, 2010

top week

When I saw Made by Rae was having this contest, I got really excited to try to make something for myself . I had been eying up a shirt I saw at Anthropologie, so why not try to make it. It should be like making clothes for the kids just a little more material right?

It wasn't to bad I bought a yard of jersey fabric and went to town. I wasted a lot of material because I was afraid I would cut it to small. I think I stitched the side seams about 3 or 4 times before it was a fit I liked. I just kept going back to the sewing machine and making it smaller a little at a time. I liked the frayed look so I went with it and had it frayed at the top and bottom of the ruffles.


make it wear it

yudu

I got the YUDU for Christmas this year and this is the first time I have gotten to do shirts for the kids. They came out ok. My S for Savannah needs a little work. and I forgot to center Austins letters. But not bad.

It does beat $25 a shirt for. It is really hard to find cute clothes for boys so I usually end up buying shirts that have funny sayings on them for my son and with the Yudu I can do them myself.

I used chiller in microsoft word.
Man of your dreams

Thursday, April 15, 2010

a new outfit


I couldn't resist this face!


What a big butt!

I saw this type of outfit on the internet someplace, went back to actually buy it and couldn't find it again. Could be because I don't know if it has a name?? So why not try to make it from memory. I'm not sure how close it is but I sure do like the way it came out. I really like the ruffle bottoms.


Photobucket


Monday, April 12, 2010

Ruffled hat


Disney at Ruffles and Stuff had a contest last month and one of the winners posted a ruffle hat I just had to have for Savannah. I made 2, this is a picture of the first one I made, I like the 2nd one better for her size. I just made it a little longer and a little wider. But it is just so cute. The flower came from this tutorial. I didn't use as many layers, I didn't want it to be to big for her.
So now I have an extra one.


SYS Thurs
Photobucket

Thursday, April 8, 2010

Shoe covers


Come in, sit down and bask
take off your shoes is all we ask
Baby crawling


So now that my little monster is crawling (well scooting) all over the place I wanted people to take their shoes of when they are in my home. I didn't want to have to ask over and over again. So I knew a sign is what I needed. But my husband comes home for lunch, which actual time spent here is about 2o-25 mins. He told me he didn't want to have to take his shoes off for that short amount of time. So why not make shoe covers? It was pretty easy too. I think I will make some more to keep by door for people who don't want to take their shoes off.


I got this saying off line somewhere...can't find the site anymore. I added baby crawling

This is a pillowcase I used from another project

Then cut it in half


I then placed my husbands shoe inside at the seam and cut across the top


I created a casting and placed the elastic inside. I didn't measure the elastic, I was just trying things out. I cut a curve at one end. The first time I did this after the casting and the next time I did it before. I liked it better to cut the "c" curve after the casting was done.

finished first one

For the next one, I tried to go off my first one since I didn't measure. I took the other half and cut it down to 9 inches
Next I cut a curve, Stitched a seam closing the bottom and the side, then created my casting for the elastic


all done. the one on the left was done first.