Thursday, February 3, 2011

Spring wardrobe


I have been tucked in my room late at night for the past week working on Spring like clothes for Savannah. I have to say I am getting better at the construction of the clothes and I can contribute it all to the million of other bloggers who are willing to share their knowledge with me. Nothing makes me happier when someone makes a comment about my daughters outfit and I can say...I made it :) I probably have about 2-3 more outfits to post and then I should be done. She is growing so fast I have to save some materials and ideas for then. I do have to admit that one outfit I just complete last night is the same tutorial I used for an outfit last summer, but I loved it so much she will probably have one until she refuses to wear it.


this skirt came from sewing in no mans land

She gives great patterns for everything she makes, and I so wish I was smaller so I could fit in her adult clothes. But for her tutorial on this one...I choose not to pleat the top, so I only cut it at 7 in instead of 8, looking back I wish I cut it a little shorter maybe even 5. But this way it will fit her longer. The skirt is made out of a thrifted shirt I bought when I was in high school, you know when it was cool to wear men's shirts? So I also didn't cut the top part as long because I was working with a small men's shirt. I was happy to find a new home for the shirt.


This next outfit came from my maternity top. It was a cowl neck, so for the skirt I just cut it at the seem and added elastic at the top for a quick and easy skirt.

This is what happens when you let the little one wear something before pictures are taken
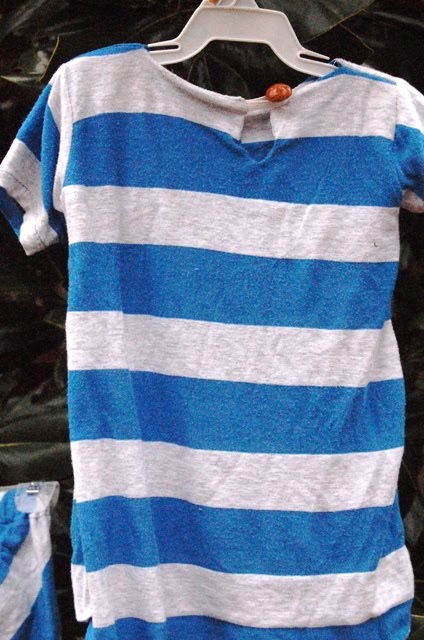
I had intended for it to be a dress, but it was to short and it became a top, that she wore with white leggins

This is material I bought last fall. I was so excited to to find this fabric in the store and then it sat until now. This is the reason I am trying to use fabric and items on hand before I purchase new items in the store. For this I just used a old shirt on hand. I ran out of gray and green thread so I serged the ends. My plan was to get thread and finish the sleeves and hem, but I think I like it the way it is

I also found a way I like to finish the neck and sleeves (when I make a sleeveless shirt/dress). I think I did for one of the shirts I made for myself last year. I think it makes the neck nice and clean.


For the bloomers I used Dana's pattern and tutorial


I can't lie here I did buy this fabric at Hobby lobby, when I drove by 2 weeks ago. I had a 40% off any item. It was originally 9.99/yrd. It was the only color they had so I made it work. I bought 1yrd and got 1 skirt, 1 dress and 1 bloomers. So I think it was worth it.


I got this idea from another blogger Me sew Crazy, who I found through a linky party (love them). I was glad she gave me the idea, I was worried what I would do with the extra fabric. Savannah looked like a little flapper earlier when she had on a silver long dress up necklace. I finished the Neck line and the sleeves as I did above.


http://sumossweetstuff.blogspot.com/" target="_blank">Sumo's Sweet Stuffhttp://i58.photobucket.com/albums/g241/summerandrus/Blog%20Graphics
/linkcopy.png"/>


Show and Tell Green

Thursday, January 27, 2011

New shoes


Have you visited http://sewingin-nomansland.blogspot.com/ ? If not then you need to hope right over there. She recently posted about an outfit that she made shoes from. She got her inspiration from Joyfolie. I had to take a peak. And boy did I fall in love. Every single pair of shoes are out of stock, but she is working on a solution to the problem. So until I can purchase a pair ( which I will do as soon as they are available).I tried my hand a pair. They still need a little work, but they were my first pair of shoes.

I have since added a strap across the top to help they stay on.

I can't wait until shoes are available :)

LINKY PARTY

http://sumossweetstuff.blogspot.com/

Craft Couture


Photobucket

Wednesday, January 26, 2011

Valentines bags

I saw these bags on a few sites and fell in love! I knew I had to have them. So I was crossing my fingers in hopes that I had some fabric that would work since I am not buying any new fabric unless absolutely necessary. I found some red sweater material, red polka dot, and red camouflage. I had sever different types of interfacing so I made it work.

My only little snag was I chose to do 2 red dot linnings and the camouflage one for the little guy (not so girly). But of course Austin chose to take one of the polka dot ones!! I would have made them all polka dot if I had known. I guess I also could have done a better job on the names. I should have just waited a few weeks...I just found out I am getting a Silhouette....Yea I am so excited.
The plan is to put a little love note for the kids in the am, and then when Valentines day arrives there will be just a few little surprises for the kido's


I really did iron my fabric this time, I promise:)


I found this great tutorial for the bags at Our Scoop

Friday, January 14, 2011

Winter wreath


I don't think I used quite as many circles as she did. I would have loved to but I didn't want to buy more felt.


With the new house I have decided to try and decorate a little...so with Christmas decorations down it is time to start.

After searching One Pretty thing I found this great blog...Domestifluff.com. I knew I found my perfect door wreath!!

I loved that I could do it any color (white was just what I had on hand), I think at some point I will try red :) I had the pins on hand, all I had to buy was the wreath form.

It was pretty easy and straight forward. I did take her suggestions on making the circles. In the post there was a link to another blog at maya*made.blogspot.com. I didn't have ink on hand so I stamped mine with paint that I didn't think I would ever use again. I think it worked pretty well, take it easy on the paint so it drys fast. I also used a spray can lid for my circles.


I really need to find my wreath hanger for the door, but until then this will work

Sunday, January 9, 2011

Bike basket


The last step for my little guy's bike was a basket. He wanted a place to put his back pack on the way home from school.

A Lemon Squeezy Home has a great tutorial for both a boy and a girl basket. I have found myself freqenting A Lemon Squezzy Home, I love all of her ideas and the tutorials are easy to follow.
Anyway I used her bike tutorial.

I used her measurements and the cut out, but I did peace it together a little different. I was a little uneasy with the hand sewing since he would be placing items in the basket.

I stitched the 4 outside pieces (Penn State fabric) together, did the same with the inner fabric (plain blue).
Then I placed one inside the other, right sides together, when I stitched around the top to close it I Left open spots at each area that I would insert the hanger piece at with one big enough to turn right side out.
Then I turned it right side out.
From there I stitched down the sides to create a pocket for the hanger and the same for the top front and sides.
When all pieces of the hanger were in I then stitched the holes closed.

I also used snaps


after I fixed the piece that attaches to the bar


This is before I changed the handle..I sewed the piece with the snaps to the back of the basket so it would hang a little higher

Friday, January 7, 2011

Free bike


When we lived in PA I belonged to a group on yahoo called free cycle.

Have you ever heard of it??

People post items they no longer need or want, if you see something you want you e-mail the other party back and make arrangements to pick it up (as long as it's not gone yet). It's pretty cool. The rule: MUST be FREE!!

Anyway a few months ago I got Austin a bike from free cycle, it was too big for him at the time (still kinda is) so I put it to the side. When I pulled it out over Christmas, he was able to ride it ok. When I picked it up the lady made it clear that it needed a new seat...Which it sure did, it had screws coming up and poking him in the butt!! I didn't realize this until after he was riding it. I thought it just needed padding, sorry little guy.


The before

Now I will be honest to say that I only looked at 2 stores before I gave up and thought I would try to make one with supplies on hand. I used vinyl I purchased months ago and padding we that we bought the pack n play ( no longer in use). The padding was probably to thick but who doesn't like extra padding when riding a bike?

After

Not perfect probably to much padding, but it was free :)

Not to bad for a free bike no rust, good tires, free training wheels and now a new seat


Wednesday, December 29, 2010

easiest blanket ever

A few years ago maybe 6, my husband bought me a 6ft love sac I still love it to this day as well as the kids now. About 2 years after that he bought me a blanket to go with it. I so loved this blanket, it stays on the sac or the couch and I use it all the time. I even take it with me when we travel. Now don't get me wrong, I didn't get the mink fury one...I don't even think they made that one when we purchased ours.

Daddy sleeping on the love sac and the blanket...everybody loves them

Anyway back to the reason for the post...
My son clammed the blanket about 1 month ago when he got sick and would not give it back. What a sad day for me. I have been trying get get it back for the entire month with every bribe I can think of.
The original


The best part about the blanket...a foot pocket

To my surprise when I went to Joan's to get the fabric for my curtains, I found this great fabric! It was just like my blanket. Very soft on 1 side and furry on the other and it was just 1 piece of fabric. In my mind all I had to do was go home and serge around the edges and all would be good!

serge around the edges


Not as fluffy as the original, but much softer in my opinion

It worked out, the fabric was a little pricey 24.99/yd then I used my coupon. I bought 1yrd, brought it home serged around the edge and now my blanket is being washed to be returned to the proper owner!! I can't wait to sit and watch a show tonight!!

Austin says it is so comfy cozy and he is not going to share it :)


I didn't put the feet pocket in so it would last longer...If I was able to afford more than a yard I would have bought more and added the pocket...but I don't think it matters much to him